一、了解临时容器
临时容器:一种特殊的容器,该容器在现有 Pod 中临时运行,以便完成用户发起的操作,例如故障排查。 你会使用临时容器来检查服务,而不是用它来构建应用程序
Pods 是 Kubernetes 应用程序的基本构建块。由于 pod 是一次性且可替换的,因此一旦 Pod 创建,就无法将容器加入到 Pod 中。取而代之的是,通常使用 Deployments 以受控的方式来删除并替换 Pod。
有时有必要检查现有 Pod 的状态,例如,对于难以复现的故障进行排查。在这些场景中,可以在现有 Pod 中运行临时容器来检查其状态并运行任意命令。
1. 什么是临时容器?
临时容器与其他容器的不同之处在于,它们缺少对资源或执行的保证,并且永远不会自动重启,因此不适用于构建应用程序。临时容器使用与常规容器相同的 ContainerSpec 段进行描述,但许多字段是不相容且不允许的。
- 临时容器没有端口配置,因此像
ports,livenessProbe,readinessProbe这样的字段是不允许的。 - Pod 资源分配是不可变的,因此
resources配置是不允许的。
临时容器是使用 API 中的一种特殊的 ephemeralcontainers 处理器进行创建的, 而不是直接添加到 pod.spec 段,因此无法使用 kubectl edit 来添加一个临时容器。与常规容器一样,将临时容器添加到 Pod 后,将不能更改或删除临时容器
2. 临时容器的用途
当由于容器崩溃或容器镜像不包含调试工具而导致 kubectl exec 无用时, 临时容器对于交互式故障排查很有用。尤其是,Distroless 镜像 允许用户部署最小的容器镜像,从而减少攻击面并减少故障和漏洞的暴露。 由于 distroless 镜像不包含 Shell 或任何的调试工具,因此很难单独使用 kubectl exec 命令进行故障排查。使用临时容器时,启用 进程名字空间共享 很有帮助,可以查看其他容器中的进程
https://github.com/GoogleContainerTools/distroless
二、使用临时容器
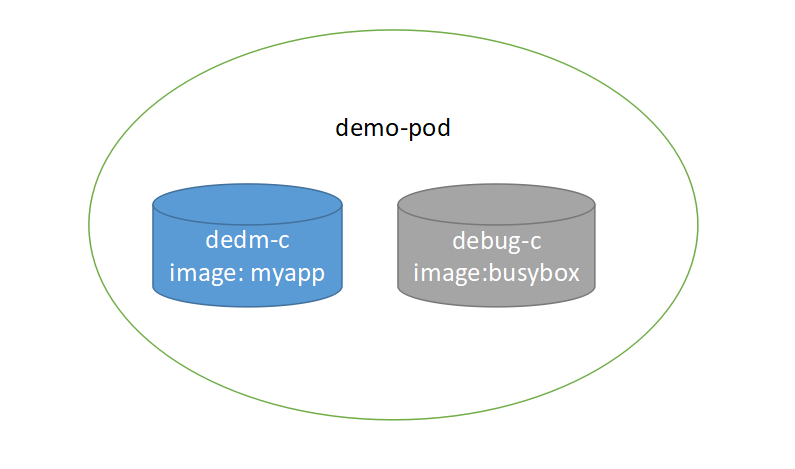
1. 给运行中的 Pod 增加临时容器
使用 kubectl debug 命令来给正在运行中的 Pod 增加一个临时容器
# 1.启动一个普通的Pod
kubectl run demo --image=nginx:1.29.0 --restart=Never

# 2.给运行中的Pod demo 增加临时容器(不创建新的pod,仅调试运行中的pod)
kubectl debug -it demo --image=yauritux/busybox-curl:latest --target=demo --image-pull-policy=IfNotPresent
命令解析
kubectl debug是 Kubernetes 提供的一个调试工具,用于诊断 Pod 的问题-it表示以交互模式(interactive 和 terminal)运行,允许用户进入调试容器的终端。demo指定了要调试的 Pod 的名称yauritux/busybox-curl:latest指定调试容器使用的镜像,这是带 curl 工具的 busybox--target=demo指定调试的目标是 demo Pod
查看POD
# 增加临时容器,-it会自动进入pod
[root@k8s-master01 ~]$ kubectl debug -it demo --image=yauritux/busybox-curl:latest --target=demo --image-pull-policy=IfNotPresent
Targeting container "demo". If you don't see processes from this container it may be because the container runtime doesn't support this feature.
Defaulting debug container name to debugger-rq9mr.
If you don't see a command prompt, try pressing enter.


# 在pod 内 访问 nginx
/home # curl localhost
<!DOCTYPE html>
<html>
<body>
<h1>Welcome to nginx!</h1>
</body>
</html>


# 新起一个终端,查看 Pod, READY 1/1 可以看出 Pod 内部只有一个容器
$ kubectl get pods -o wide
NAME   READY   STATUS    RESTARTS   AGE   IP              NODE         NOMINATED NODE   READINESS GATES
demo   1/1     Running   0          99m   171.20.85.201   k8s-node01   <none>           <none>


# 查看 Pod 详情,里面就有临时容器
$ kubectl get pod demo -o yaml
apiVersion: v1
kind: Pod
metadata:
......
spec:
  containers:
  # 主容器
  - image: nginx:1.29.0
    imagePullPolicy: IfNotPresent
    ......
  dnsPolicy: ClusterFirst
  enableServiceLinks: true
  ephemeralContainers:
  - image: yauritux/busybox-curl:latest
    imagePullPolicy: IfNotPresent
    name: debugger-4rrx4
    ......
  nodeName: k8s-node01
  preemptionPolicy: PreemptLowerPriority
  priority: 0
  restartPolicy: Never
  ......
status:
  conditions:
  ......
  ephemeralContainerStatuses:
  - containerID: docker://ea0f00240984545badc309b3f23617b924200ad9851f979dfdf83d559ad669e2
    image: yauritux/busybox-curl:latest
    imageID: docker://sha256:cda3fcfbc75d9cd4624dc403fd5f54f2e49b84874e4cf8d01a56f0e2db6c72e6
    lastState: {}
    name: debugger-4rrx4
    ready: false
    restartCount: 0
    state:
      running:
        startedAt: "2025-08-05T11:15:27Z"
  hostIP: 10.20.1.140
  hostIPs:
  - ip: 10.20.1.140
  phase: Running
  podIP: 171.20.85.202
  podIPs:
  - ip: 171.20.85.202
  qosClass: BestEffort
  startTime: "2025-08-05T11:14:39Z"
总结:这种方式调试 pod 不会创建新的 pod,只在原有的 pod 中增加临时容器。
2. 通过 Pod 副本调试
在添加新的容器时创建 Pod 副本
当应用程序正在运行但其表现不符合预期时,你会希望在 Pod 中添加额外的调试工具, 这时添加新容器是很有用的
# 1.启动一个普通的Pod
$ kubectl run myapp --image=busybox:1.31.1 --restart=Never -- sleep 1d

# 2.建立 myapp 的一个名为 myapp-debug 的副本, 新增了一个用于调试的 Ubuntu 容器
$ kubectl debug myapp -it --image=ubuntu:20.04 --share-processes --copy-to=myapp-debug
# 如果你没有使用 --container 指定新的容器名,kubectl debug 会自动生成的。
# 默认情况下,-i 标志使 kubectl debug 附加到新容器上。 你可以通过指定 --attach=false 来防止这种情况
# --share-processes 允许在此 Pod 中的其他容器中查看该容器的进程。 
查看POD
# 创建新的pod myapp-debug, 使用镜像 ubuntu:20.04, 与 myapp 共享进程
$ kubectl debug myapp -it --image=ubuntu:20.04 --share-processes --copy-to=myapp-debug
Defaulting debug container name to debugger-8hjcc.
If you don't see a command prompt, try pressing enter.
# 查看进程
root@myapp-debug:/# ps aux
USER         PID %CPU %MEM    VSZ   RSS TTY      STAT START   TIME COMMAND
65535          1  0.0  0.0   1028     4 ?        Ss   12:41   0:00 /pause
root           7  0.0  0.0   1296     4 ?        Ss   12:42   0:00 sleep 1d # busybox 进程
root          13  0.0  0.0   4116  3532 pts/0    Ss   12:42   0:00 /bin/bash
root          24  0.0  0.0   5900  2852 pts/0    R+   12:50   0:00 ps aux


# 新起shell终端,查看Pod
# 新建了一个 pod myapp-debug, READY 2/2 表示里面有两个容器(busybox 和 ubuntu)
$ kubectl get pods -o wide
NAME          READY   STATUS    RESTARTS   AGE     IP              NODE         NOMINATED NODE   READINESS GATES
myapp         1/1     Running   0          3m50s   171.20.85.203   k8s-node01   <none>           <none>
myapp-debug   2/2     Running   0          3m35s   171.20.85.204   k8s-node01   <none>           <none>


# 查看新建的 Pod 详情
$ kubectl get pod myapp-debug -o yaml
apiVersion: v1
kind: Pod
metadata:
  ......
spec:
  containers:
  # 第一个容器 busybox
  - args:
    - sleep
    - 1d
    image: busybox:1.31.1
    imagePullPolicy: IfNotPresent
    name: myapp
    resources: {}
    terminationMessagePath: /dev/termination-log
    terminationMessagePolicy: File
    volumeMounts:
    - mountPath: /var/run/secrets/kubernetes.io/serviceaccount
      name: kube-api-access-hmf9b
      readOnly: true
  # 第二个容器 ubuntu
  - image: ubuntu:20.04
    imagePullPolicy: IfNotPresent
    name: debugger-8hjcc
    resources: {}
    stdin: true
    terminationMessagePath: /dev/termination-log
    terminationMessagePolicy: File
    tty: true
    volumeMounts:
    - mountPath: /var/run/secrets/kubernetes.io/serviceaccount
      name: kube-api-access-hmf9b
      readOnly: true
  dnsPolicy: ClusterFirst
  containerStatuses:
  ......
3. 在改变 Pod 命令时创建 Pod 副本
有时更改容器的命令很有用,例如添加调试标志或因为应用崩溃
# 1.启动pod,执行命令 false
# false 是 busybox 默认命令之一,执行后容器会退出
$ kubectl run --image=busybox:1.31.1 myapp -- false


# 2.使用 kubectl debug 命令创建该 Pod 的一个副本, 在该副本中命令改变为交互式 shell:
$ kubectl debug myapp -it --copy-to=myapp-debug --container=myapp -- sh
# 要更改指定容器的命令,你必须用 --container 命令指定容器的名字, 否则 kubectl debug 将建立一个新的容器运行你指定的命令
# 默认情况下,标志 -i 使 kubectl debug 附加到容器。 你可通过指定 --attach=false 来防止这种情况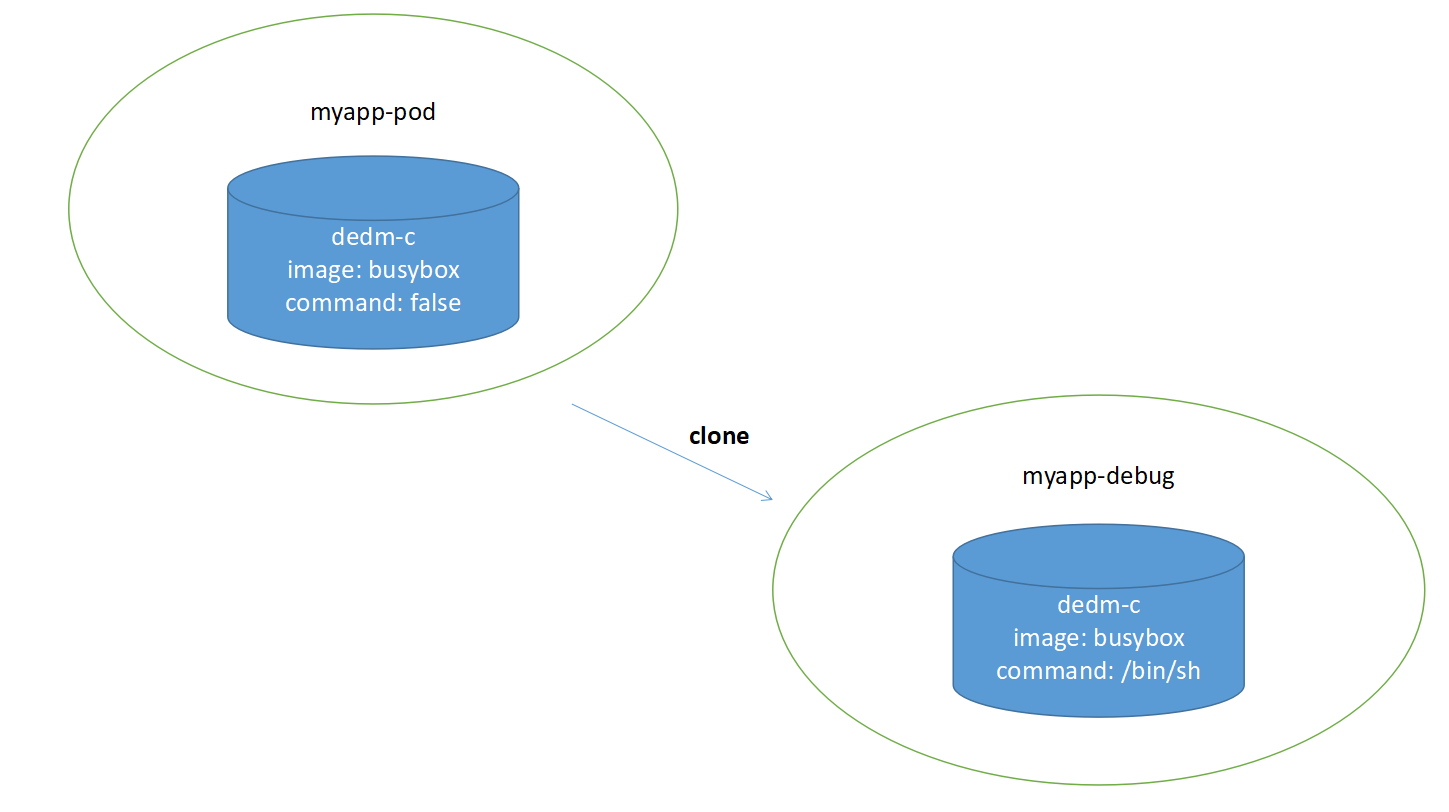
查看Pod
# 使用 kubectl debug 命令创建该 Pod 的一个副本, 在该副本中命令为 sh
$ kubectl debug myapp -it --copy-to=myapp-debug --container=myapp -- sh
If you don't see a command prompt, try pressing enter.
# 查看进程
/ # ps aux
PID   USER     TIME  COMMAND
    1 root      0:00 sh 		# 此为pod执行的进程命令:sh
    7 root      0:00 ps aux
/ #


# 新起shell终端,查看Pod,myapp-debug 为复制的pod,修改了shell,成功运行。
$ kubectl get pods -o wide
NAME          READY   STATUS             RESTARTS      AGE   IP              NODE         NOMINATED NODE   READINESS GATES
myapp         0/1     CrashLoopBackOff   2 (16s ago)   41s   171.20.85.205   k8s-node01   <none>           <none>
myapp-debug   1/1     Running            0             22s   171.20.58.205   k8s-node02   <none>           <none>
4. 在同一个节点上创建 pod 进行调试
如果这些方法都不起作用,你可以找到运行 Pod 的节点,然后创建一个 Pod 运行在该节点上。 你可以通过 kubectl debug 在节点上创建一个交互式 Shell
kubectl debug node/mynode -it --image=ubuntu
# kubectl debug 基于节点的名字自动生成新的 Pod 的名字
# 节点的根文件系统会被挂载在 /host。
# 新的调试容器运行在主机 IPC 名字空间、主机网络名字空间以及主机 PID 名字空间内, Pod 没有特权,因此读取某些进程信息可能会失败,并且 chroot /host 也会失败
# 如果你需要一个特权 Pod,需要手动创建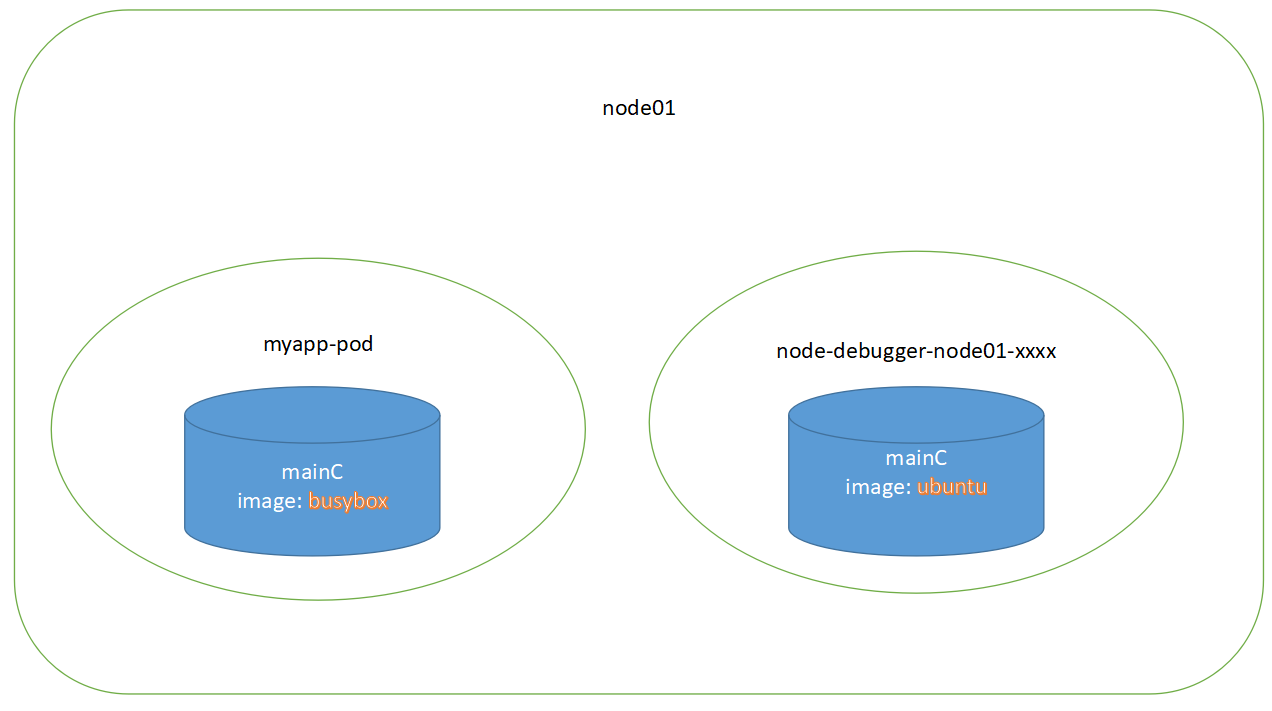
测试
# 会在 Kubernetes 集群的 k8s-node01 节点上启动一个临时的调试容器,使用 ubuntu:20.04 镜像
$ kubectl debug node/k8s-node01 -it --image=ubuntu:20.04
Creating debugging pod node-debugger-k8s-node01-5zhwj with container debugger on node k8s-node01.
If you don't see a command prompt, try pressing enter.

# 查看物理机内存
root@k8s-node01:/# free -m
              total        used        free      shared  buff/cache   available
Mem:           7671         864        4760         154        2047        6381
Swap:             0           0           0

# 查看目录机目录
root@k8s-node01:/# cd /host/opt/images/
root@k8s-node01:/host/opt/images# ls
all-in-one.tar       defaultbackend-amd64-1.5.tar
常用场景
kubectl debug node/ 常用于以下场景:
- 检查节点文件系统:
- 检查节点上的日志文件(比如 /var/log)。
- 查看 Kubernetes 相关文件(比如 /etc/kubernetes 或 /var/lib/kubelet)。
- 诊断网络问题:
- 检查节点的网络配置(比如 ifconfig、ip addr)。
- 测试网络连通性(比如 ping、curl)。
- 检查进程或资源:
- 查看节点上的运行进程(ps aux)。
- 检查磁盘使用情况(df -h)或内存状态(free -m)。
- 调试 Kubernetes 组件:
- 检查 kubelet、containerd 或 Docker 的状态。
- 验证节点的 CRI(容器运行时接口)配置。
参考链接
http://kubernetes.hankbook.cn/pods/ephemeral-containers.html
https://cloudmessage.top/archives/k8s-lin-shi-rong-qi-guan-fang-diao-shi-ji-zhi
转载请注明来源,欢迎对文章中的引用来源进行考证,欢迎指出任何有错误或不够清晰的表达。可以在下面评论区评论,也可以邮件至 george_95@126.com