一、常用原子操作类
JDK文档:https://www.runoob.com/manual/jdk11api/java.base/java/util/concurrent/atomic/package-summary.html
1. 为什么需要原子操作类
对于多线程,在此之前已经了解到了一个关键字 volatile, volatile 解决多线程内存不可见问题。对于一写多读,是可以解决变量同步问题,但是如果多写,同样无法解决线程安全问题。
说明:如果是 count++操作,使用如下类实现:
AtomicInteger count = new AtomicInteger(0);
count.addAndGet(1);
如果是 JDK8,推荐使用 LongAdder 对象,比 AtomicLong 性能更好(减少乐观锁的重试次数)。
2. 有哪些原子操作类
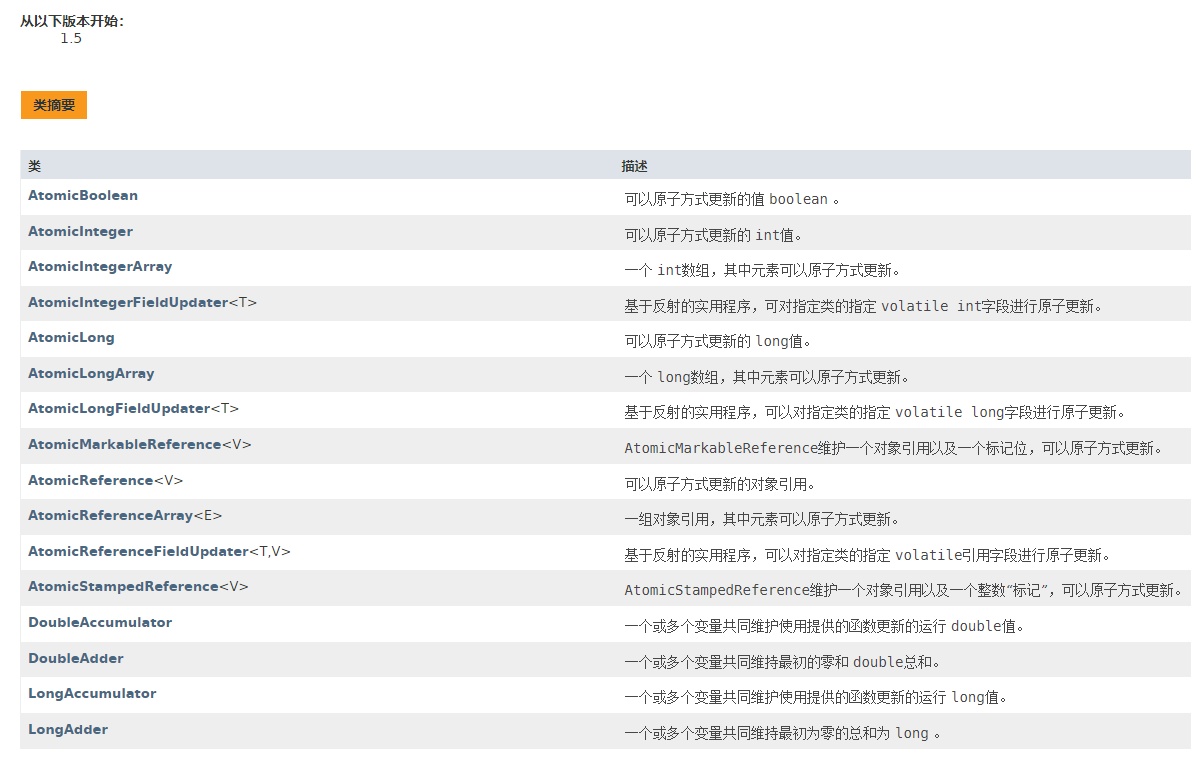
- AtomicBoolean
- AtomicInteger
- AtomicIntegerArray
- AtomicIntegerFieldUpdater
- AtomicLong
- AtomicLongArray
- AtomicLongFieldUpdater
- AtomicMarkableReference
- AtomicReference
- AtomicReferenceArray
- AtomicReferenceFieldUpdater
- AtomicStampedReference
- DoubleAccumulator
- DoubleAdder
- LongAccumulator
- LongAdder
二、分类学习
1. 基本类型原子类
- AtomicInteger
- AtomicBoolean
- AtomicLong
1.1 常用API简介
- public final int get() //获取当前的值
- public final int getAndSet(int newValue) // 获取当前的值,并设置新的值
- public final int getAndIncrement() // 获取当前的值,并自增
- public final int getAndDecrement() // 获取当前的值,并自减
- public final int getAndAdd(int delta) // 获取当前的值,并加上预期的值
- boolean compareAndSet(int expect, int update) // 如果输入的数值等于预期值,则以原子方式将该值设置为输入值(update)
1.2 测试案例
1.2.1 错误案例
开启50个线程,对一个原子类变量进行操作
public class AtomicIntegerTest {

    private static int size = 50; // 50个线程
    public static void main(String[] args) {
        AtomicInteger atomicInteger = new AtomicInteger(0);

        for (int i = 0; i < size; i++) {
            new Thread(() -> {
                for (int j = 0; j < 1000; j++) {
                    atomicInteger.getAndIncrement();
                }
            }, "t" + i).start();
        }

        System.out.println("运行结果:" + atomicInteger.get());
    }
}
运行结果:
运行结果:31056AtomicInteger 是一个线程安全的原子操作类,但是执行结果却跟预期的不一致,这是为什么?
原因:在打印结果的时候,50个线程并没有完全运行结束,导致最后获得的结果跟预期不一致。
1.2.2 解决方式
- 方式一:在代码中添加 sleep,等待其它线程结束后再打印主线程
- 此方式并不推荐,因为在实际开发中并不确定要等待多久,sleep操作影响系统的执行效率
- 方式二:使用
CountDownLatch
public class AtomicIntegerTest {

    private static int size = 50; // 50个线程

    private static CountDownLatch countDownLatch = new CountDownLatch(50);
    public static void main(String[] args) throws InterruptedException {
        AtomicInteger atomicInteger = new AtomicInteger(0);

        for (int i = 0; i < size; i++) {
            new Thread(() -> {
                try {
                    for (int j = 0; j < 1000; j++) {
                        atomicInteger.getAndIncrement();
                    }
                } finally {
                    countDownLatch.countDown();
                }
            }, "t" + i).start();
        }

        // 方式一:等待线程运行结果后,再打印
//        TimeUnit.SECONDS.sleep(2);

        // 方式二:使用 countDownLatch
        countDownLatch.await();

        System.out.println("运行结果:" + atomicInteger.get());
    }
}
2. 数组类型原子类
- AtomicIntegerArray
- AtomicLongArray
- AtomicReferenceArray
2.1 使用案例
public class AtomicIntegerArrayDemo {
    public static void main(String[] args) {
        // 方式一:指定数组长度
        AtomicIntegerArray atomicIntegerArray = new AtomicIntegerArray(new int[5]);
        // 方式二:指定数组长度
        //AtomicIntegerArray atomicIntegerArray = new AtomicIntegerArray(5);
        // 方式三:指定数组长度并初始化内容
        //AtomicIntegerArray atomicIntegerArray = new AtomicIntegerArray(new int[]{1,2,3,4,5});

        for (int i = 0; i < atomicIntegerArray.length(); i++) {
            System.out.println(atomicIntegerArray.get(i));
        }
        System.out.println();
        System.out.println();
        System.out.println();
        int tmpInt = 0;

        // 指定下标设置内容
        tmpInt = atomicIntegerArray.getAndSet(0, 1122);
        System.out.println(tmpInt + "\t" + atomicIntegerArray.get(0)); // 0 1122
        // 指定下标元素自增
        atomicIntegerArray.getAndIncrement(1);
        atomicIntegerArray.getAndIncrement(1);
        tmpInt = atomicIntegerArray.getAndIncrement(1);
        // 打印下标元素
        System.out.println(tmpInt + "\t" + atomicIntegerArray.get(1)); // 2 3

    }
}
打印结果:
0
0
0
0
0


0	1122
2	3
3. 引用类型原子类
- AtomicReference
- AtomicStampedReference
- AtomicMarkableReference
3.1 AtomicReference
基础使用案例
public class AtomicReferenceTest {
public static void main(String[] args) {
User1 user1 = new User1("张三", 20);
User1 user2 = new User1("george", 22);
AtomicReference<User1> atomicUser1 = new AtomicReference<>();
atomicUser1.set(user1);
System.out.println("当前人员:" + atomicUser1.get());
// 第一次比较替换,张三 换成 george, 结果成功
System.out.println(atomicUser1.compareAndSet(user1, user2) + "\t" + atomicUser1.get());
// 第二次比较替换,张三 换成 george, 结果失败
System.out.println(atomicUser1.compareAndSet(user1, user2) + "\t" + atomicUser1.get());
}
}
class User1 {
private String name;
private Integer age;
}实现自旋锁
public class MySpinLock {
    AtomicReference<Thread> atomicReference = new AtomicReference<>();

    public void lock() {
        // 当没有替换成当前线程,则表示获取锁失败,线程自旋
        while (!atomicReference.compareAndSet(null, Thread.currentThread())) {

        }
        System.out.println(Thread.currentThread().getName() + "获取锁成功");
    }

    public void unlock() {
        while (atomicReference.compareAndSet(Thread.currentThread(), null)) {
            System.out.println(Thread.currentThread().getName() + "解锁成功");
        }
    }

    public static void main(String[] args) throws InterruptedException {
        MySpinLock lock = new MySpinLock();
        new Thread(() -> {
            // 获取锁
            lock.lock();
            try {
                // 阻塞3秒
                TimeUnit.SECONDS.sleep(3);
            } catch (InterruptedException e) {
                throw new RuntimeException(e);
            }
            // 解锁
            lock.unlock();
        }, "t1").start();

        // 程序暂停1秒, 保证t1先拿到锁
        TimeUnit.SECONDS.sleep(1);
        new Thread(() -> {
            lock.lock();
            lock.unlock();
        }, "t2").start();
    }
}
3.2 AtomicStampedReference
携带版本号的引用类型原子类,可以解决ABA问题
使用案例:
public class ABATest {

    // 初始值:100   初始版本号:1
    static AtomicStampedReference<Integer> stampedReference = new AtomicStampedReference<>(100, 1);

    public static void main(String[] args) {
        new Thread(() -> {
            int stamp = stampedReference.getStamp();
            System.out.println(Thread.currentThread().getName() + " 默认获取到的值:" + stampedReference.getReference() + "\t默认版本号:" + stamp);

            try {
                TimeUnit.SECONDS.sleep(1);
            } catch (InterruptedException e) {
                throw new RuntimeException(e);
            }

            // 修改值,将版本号加1
            boolean flag1 = stampedReference.compareAndSet(100, 101, stampedReference.getStamp(), stampedReference.getStamp() + 1);
            System.out.println(Thread.currentThread().getName() + "第一次修改:" + flag1);
            // 修改值,将版本号加1
            boolean flag2 = stampedReference.compareAndSet(101, 100, stampedReference.getStamp(), stampedReference.getStamp() + 1);
            System.out.println(Thread.currentThread().getName() + "第二次修改:" + flag2);

            System.out.println("修改后的值:" + stampedReference.getReference() + "\t版本号:" + stampedReference.getStamp());
        }, "t1").start();


        new Thread(() -> {
            int stamp = stampedReference.getStamp();
            System.out.println(Thread.currentThread().getName() + " 默认获取到的值:" + stampedReference.getReference() + "\t默认版本号:" + stamp);

            try {
                TimeUnit.SECONDS.sleep(3);
            } catch (InterruptedException e) {
                throw new RuntimeException(e);
            }

            // 修改值,将版本号加1
            boolean flag = stampedReference.compareAndSet(100, 2024, stamp, stampedReference.getStamp() + 1);
            System.out.println(Thread.currentThread().getName() + "修改:" + flag);

            System.out.println("修改后的值:" + stampedReference.getReference() + "\t版本号:" + stampedReference.getStamp());
        }, "t2").start();
    }
}
3.3 AtomicMarkableReference
原子更新带有标记位的引用类型对象.
解决对象是否修改过的问题,它的定义就是将状态戳简化为 true|false。
public class AtomicMarkableReferenceDemo {
    static AtomicMarkableReference atomicMarkableReference = new AtomicMarkableReference(100, false);

    public static void main(String[] args) {
        new Thread(() -> {
            boolean marked = atomicMarkableReference.isMarked();
            System.out.println(Thread.currentThread().getName() + "\t" + "---默认修改标识:" + marked);
            try {
                TimeUnit.SECONDS.sleep(1);
            } catch (InterruptedException e) {
                e.printStackTrace();
            }
            atomicMarkableReference.compareAndSet(100, 101, marked, !marked);
        }, "t1").start();

        new Thread(() -> {
            boolean marked = atomicMarkableReference.isMarked();
            System.out.println(Thread.currentThread().getName() + "\t" + "---默认修改标识:" + marked);
            try {
                TimeUnit.SECONDS.sleep(2);
            } catch (InterruptedException e) {
                e.printStackTrace();
            }
            boolean b = atomicMarkableReference.compareAndSet(100, 20210308, marked, !marked);

            System.out.println(Thread.currentThread().getName() + "\t" + "---操作是否成功:" + b);
            System.out.println(Thread.currentThread().getName() + "\t" + atomicMarkableReference.getReference());
            System.out.println(Thread.currentThread().getName() + "\t" + atomicMarkableReference.isMarked());

        }, "t2").start();
    }
}
运行结果:
t1	---默认修改标识:false
t2	---默认修改标识:false
t2	---操作是否成功:false
t2	101
t2	true
4. 对象的属性修改原子类
4.1 原子类
AtomicIntegerFieldUpdater
原子更新对象中int类型字段的值
AtomicLongFieldUpdater
原子更新对象中Long类型字段的值
AtomicReferenceFieldUpdater
原子更新引用类型字段的值
4.2 使用目的
以一种线程安全的方式操作非线程安全对象内的某些字段
4.3 使用要求
更新的对象属性必须使用 public volatile 修饰符。
因为对象的属性修改类型原子类都是抽象类,所以每次使用都必须使用静态方法newUpdater()创建一个更新器,并且需要设置想要更新的类和属性。
4.4 使用案例
AtomicIntegerFieldUpdater : Integer 类型字段的原子修改
public class AtomicIntegerFieldUpdaterTest {
    public static void main(String[] args) throws InterruptedException {
        Bank bank = new Bank();
        // 创建10个线程,每个线程操作1000次
        for (int i = 0; i < 10; i++) {
            new Thread(() -> {
                for (int j = 0; j < 1000; j++) {
                    bank.add(bank);
                }
            }).start();
        }

        // 主线程等待其它线程运行结束
        TimeUnit.SECONDS.sleep(3);

        System.out.println("账户还剩:" + bank.money);
    }
}

class Bank {
    //以一种线程安全的方式操作非线程安全对象内的某些字段
    //1 更新的对象属性必须使用 public volatile 修饰符。
    public volatile int money = 0;

    public String name;

    //2 因为对象的属性修改类型原子类都是抽象类,所以每次使用都必须
    // 使用静态方法newUpdater()创建一个更新器,并且需要设置想要更新的类和属性。
    AtomicIntegerFieldUpdater<Bank> fieldUpdater = AtomicIntegerFieldUpdater.newUpdater(Bank.class, "money");

    public void add(Bank bank) {
        // 每次增加10
        fieldUpdater.getAndAdd(bank, 10);
    }
}
运行结果:
账户还剩:100000AtomicReferenceFieldUpdater: 引用类型字段的原子修改
class MyVar {
    public volatile MyVar var = null;
    AtomicReferenceFieldUpdater<MyVar, MyVar> updater = AtomicReferenceFieldUpdater.newUpdater(MyVar.class, MyVar.class, "var");

    public void init(MyVar myVar) {

        if (updater.compareAndSet(myVar, null, new MyVar())) {
            System.out.println(Thread.currentThread().getName() + "\t" + "---start init");
            try {
                TimeUnit.SECONDS.sleep(3);
            } catch (InterruptedException e) {
                e.printStackTrace();
            }
            System.out.println(Thread.currentThread().getName() + "\t" + "---end init");
        } else {
            System.out.println(Thread.currentThread().getName() + "\t" + "---抢夺失败,已经有线程在修改中");
        }
    }

}


/**
 * @auther zzyy
 * @create 2021-03-22 15:20
 * 多线程并发调用一个类的初始化方法,如果未被初始化过,将执行初始化工作,要求只能初始化一次
 */
public class AtomicReferenceFieldUpdaterDemo {
    public static void main(String[] args) {
        MyVar myVar = new MyVar();

        for (int i = 1; i <= 5; i++) {
            new Thread(() -> {
                myVar.init(myVar);
            }, String.valueOf(i)).start();
        }
    }
}
运行结果:
1	---start init
4	---抢夺失败,已经有线程在修改中
3	---抢夺失败,已经有线程在修改中
2	---抢夺失败,已经有线程在修改中
5	---抢夺失败,已经有线程在修改中
1	---end init
三、JDK8新增的原子操作类
1. 原子类
- DoubleAccumulator
- DoubleAdder
- LongAccumulator
- LongAdder
2. 常用API
void add(long x) 将当前的value加x
void increment() 将当前的value加1
void decrement() 将当前的value减1
long sum()
返回当前值。特别注意,在没有并发更新value的情况下,sum会返回一个精确值,在存在并发的情况下,sum不保证返回精确值。
void reset()
将value重置为0,可用于替代重新new一个 LongAdder,但此方法只可以在没有并发更新的情况下使用。
long sumThenReset()
获取当前value,并将value重置为0
3. 入门讲解
LongAdder 只能用来计算加法,且从零开始计算.
LongAccumulator 提供了自定义的函数操作.
public class LongAccumulatorDemo {
//LongAccumulator longAccumulator = new LongAccumulator((x, y) -> x + y,0);
// 初始值为10,每次调用,将传进来的参数与10相减
LongAccumulator longAccumulator = new LongAccumulator(new LongBinaryOperator() {
public long applyAsLong(long left, long right) {
return left - right;
}
}, 10); // 10 是初始值
public void add_LongAccumulator() {
// 每次减1
longAccumulator.accumulate(1);
}
public static void main(String[] args) {
LongAccumulatorDemo demo = new LongAccumulatorDemo();
// 第一次操作
demo.add_LongAccumulator();
// 第二次操作
demo.add_LongAccumulator();
// 打印结果
System.out.println("执行结果:" + demo.longAccumulator.longValue()); // 结果:8
}
}LongAdder 使用案例
public class LongAdderAPIDemo {
    public static void main(String[] args) {
        LongAdder longAdder = new LongAdder();//只能做加法

        longAdder.increment();
        longAdder.increment();
        longAdder.increment();

        System.out.println(longAdder.longValue()); // 3
    }
}
4. LongAdder 高性能对比
对比在原子操作中,使用 synchronized、AtomicInteger、AtomicLong、LongAdder、LongAccumulator的性能差距
4.1 测试代码:
class ClickNumber {
    int number = 0;

    /**
     * 对比1:使用 synchronized
     */
    public synchronized void add_Synchronized() {
        number++;
    }

    AtomicInteger atomicInteger = new AtomicInteger();

    /**
     * 对比2: AtomicInteger
     */
    public void add_AtomicInteger() {
        atomicInteger.incrementAndGet();
    }

    AtomicLong atomicLong = new AtomicLong();

    /**
     * 对比3:AtomicLong
     */
    public void add_AtomicLong() {
        atomicLong.incrementAndGet();
    }

    LongAdder longAdder = new LongAdder();

    /**
     * 对比4:LongAdder
     */
    public void add_LongAdder() {
        longAdder.increment();
        //longAdder.sum();
    }

    LongAccumulator longAccumulator = new LongAccumulator((x, y) -> x + y, 0);

    /**
     * 对比5:LongAccumulator
     */
    public void add_LongAccumulator() {
        longAccumulator.accumulate(1);
    }

}


/**
 * 50个线程,每个线程100W次,总点赞数出来
 */
public class LongAdderCalcDemo {
    public static final int SIZE_THREAD = 50;
    public static final int _1W = 10000;

    public static void main(String[] args) throws InterruptedException {
        ClickNumber clickNumber = new ClickNumber();
        long startTime;
        long endTime;

        CountDownLatch countDownLatch1 = new CountDownLatch(SIZE_THREAD);
        CountDownLatch countDownLatch2 = new CountDownLatch(SIZE_THREAD);
        CountDownLatch countDownLatch3 = new CountDownLatch(SIZE_THREAD);
        CountDownLatch countDownLatch4 = new CountDownLatch(SIZE_THREAD);
        CountDownLatch countDownLatch5 = new CountDownLatch(SIZE_THREAD);
        //========================

        /****************** synchronized *******************/
        startTime = System.currentTimeMillis();
        for (int i = 1; i <= SIZE_THREAD; i++) {
            new Thread(() -> {
                try {
                    for (int j = 1; j <= 100 * _1W; j++) {
                        clickNumber.add_Synchronized();
                    }
                } catch (Exception e) {
                    e.printStackTrace();
                } finally {
                    countDownLatch1.countDown();
                }
            }, String.valueOf(i)).start();
        }
        countDownLatch1.await();
        endTime = System.currentTimeMillis();
        System.out.println("----costTime: " + (endTime - startTime) + " 毫秒" + "\t add_Synchronized" + "\t" + clickNumber.number);


        /****************** AtomicInteger *******************/
        startTime = System.currentTimeMillis();
        for (int i = 1; i <= SIZE_THREAD; i++) {
            new Thread(() -> {
                try {
                    for (int j = 1; j <= 100 * _1W; j++) {
                        clickNumber.add_AtomicInteger();
                    }
                } catch (Exception e) {
                    e.printStackTrace();
                } finally {
                    countDownLatch2.countDown();
                }
            }, String.valueOf(i)).start();
        }
        countDownLatch2.await();
        endTime = System.currentTimeMillis();
        System.out.println("----costTime: " + (endTime - startTime) + " 毫秒" + "\t add_AtomicInteger" + "\t" + clickNumber.atomicInteger.get());

        /****************** AtomicLong *******************/
        startTime = System.currentTimeMillis();
        for (int i = 1; i <= SIZE_THREAD; i++) {
            new Thread(() -> {
                try {
                    for (int j = 1; j <= 100 * _1W; j++) {
                        clickNumber.add_AtomicLong();
                    }
                } catch (Exception e) {
                    e.printStackTrace();
                } finally {
                    countDownLatch3.countDown();
                }
            }, String.valueOf(i)).start();
        }
        countDownLatch3.await();
        endTime = System.currentTimeMillis();
        System.out.println("----costTime: " + (endTime - startTime) + " 毫秒" + "\t add_AtomicLong" + "\t" + clickNumber.atomicLong.get());

        /****************** LongAdder *******************/
        startTime = System.currentTimeMillis();
        for (int i = 1; i <= SIZE_THREAD; i++) {
            new Thread(() -> {
                try {
                    for (int j = 1; j <= 100 * _1W; j++) {
                        clickNumber.add_LongAdder();
                    }
                } catch (Exception e) {
                    e.printStackTrace();
                } finally {
                    countDownLatch4.countDown();
                }
            }, String.valueOf(i)).start();
        }
        countDownLatch4.await();
        endTime = System.currentTimeMillis();
        System.out.println("----costTime: " + (endTime - startTime) + " 毫秒" + "\t add_LongAdder" + "\t" + clickNumber.longAdder.longValue());


        /****************** LongAccumulator *******************/
        startTime = System.currentTimeMillis();
        for (int i = 1; i <= SIZE_THREAD; i++) {
            new Thread(() -> {
                try {
                    for (int j = 1; j <= 100 * _1W; j++) {
                        clickNumber.add_LongAccumulator();
                    }
                } catch (Exception e) {
                    e.printStackTrace();
                } finally {
                    countDownLatch5.countDown();
                }
            }, String.valueOf(i)).start();
        }
        countDownLatch5.await();
        endTime = System.currentTimeMillis();
        System.out.println("----costTime: " + (endTime - startTime) + " 毫秒" + "\t add_LongAccumulator" + "\t" + clickNumber.longAccumulator.longValue());
    }
}
打印结果:
----costTime: 2591 毫秒	 add_Synchronized	50000000
----costTime: 702 毫秒	 add_AtomicInteger	50000000
----costTime: 622 毫秒	 add_AtomicLong	50000000
----costTime: 89 毫秒	     add_LongAdder	50000000
----costTime: 137 毫秒	 add_LongAccumulator	50000000
4.2 结论
LongAdder、LongAccumulator 在高并发程序中的性能表现要远好于其它原子操作。
四、源码、原理分析
解释:原理(LongAdder为什么这么快)?
1. 原理解析
1.1 原理概述
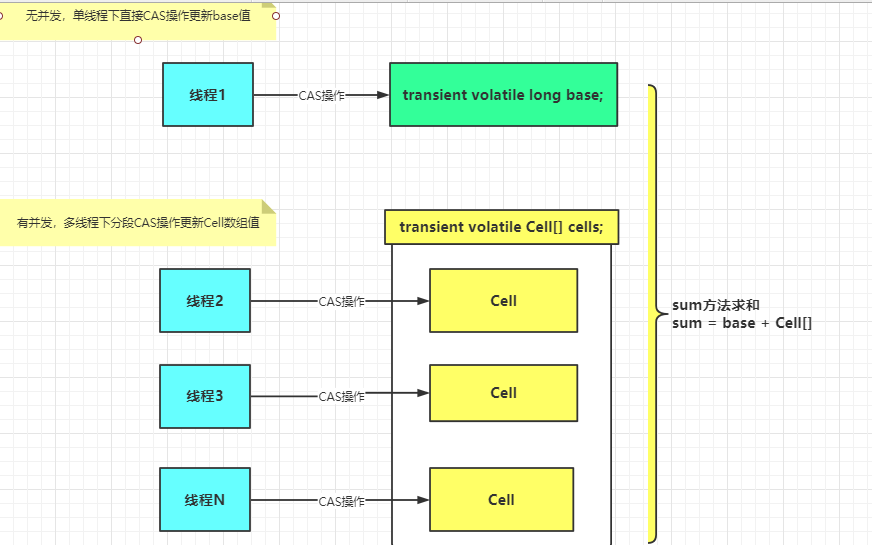
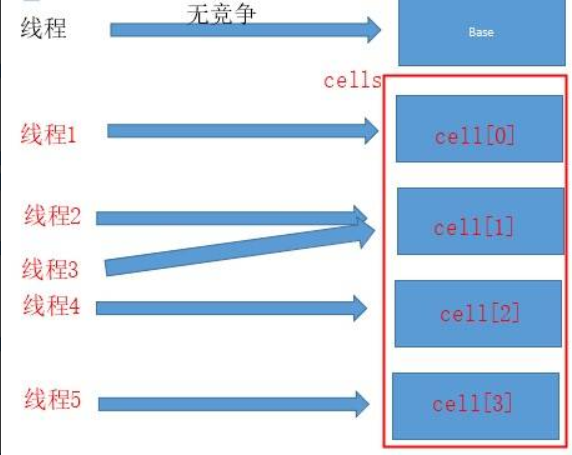
LongAdder的基本思路就是分散热点,将value值分散到一个Cell数组中,不同线程会命中到数组的不同槽中,各个线程只对自己槽中的那个值进行CAS操作,这样热点就被分散了,冲突的概率就小很多。如果要获取真正的long值,只要将各个槽中的变量值累加返回。
sum()会将所有Cell数组中的value和base累加作为返回值,核心的思想就是将之前AtomicLong一个value的更新压力分散到多个value中去,从而降级更新热点。
1.2 图示
实现原理如图:
1.3 数学表达
$$
value = base + \sum_{i=0}^n Cell[i]
$$
内部有一个base变量,一个Cell[]数组。
- base变量:非竞态条件下,直接累加到该变量上
- Cell[]数组:竞态条件下,累加个各个线程自己的槽Cell[i]中
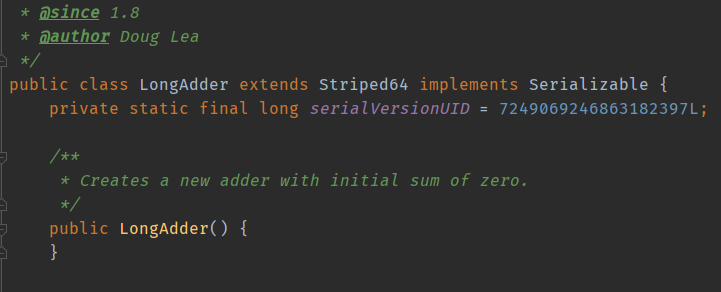
2. LongAdder 架构

LongAdder是Striped64的子类
3. Striped64
3.1 成员变量
Striped64有几个比较重要的成员变量
/** 计算当前CPU数量,Cell[] 扩容时会用到 */
static final int NCPU = Runtime.getRuntime().availableProcessors();

/**
 * Table of cells. When non-null, size is a power of 2.
 */
transient volatile Cell[] cells;

/**
 * 类似于AtomicLong中全局的value值。在没有竞争情况下数据直接累加到base上,或者cells扩容时,也需要将数据写入到base上
 */
transient volatile long base;

/**
 * 初始化cells或者扩容cells需要获取锁,0:表示无锁状态 1:表示其他线程已经持有了锁
 */
transient volatile int cellsBusy;
3.2 成员方法
Striped64有几个比较重要的成员方法
/**
* 通过CAS操作修改 cellsBusy 的值,CAS成功代表获取锁,返回true
*/
final boolean casCellsBusy() {
return CELLSBUSY.compareAndSet(this, 0, 1);
}
/**
* 获取当前线程的hash值
*/
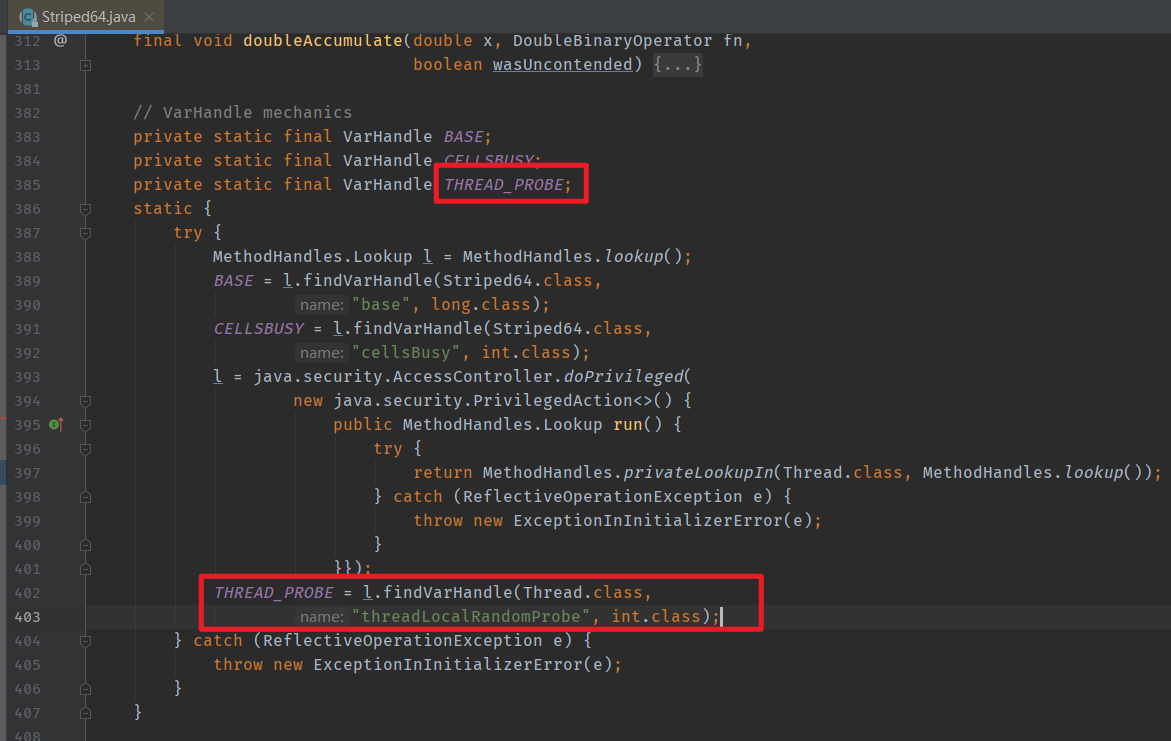
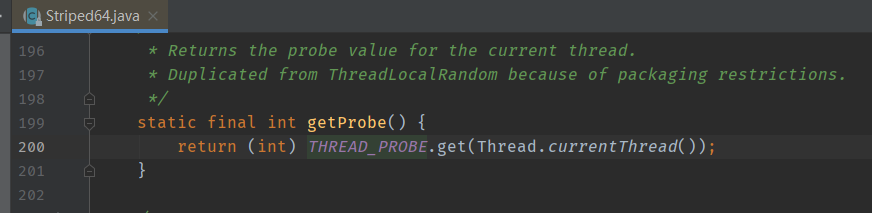
static final int getProbe() {
return (int) THREAD_PROBE.get(Thread.currentThread());
}
/**
* 重置当前线程的hash值
*/
static final int advanceProbe(int probe) {
probe ^= probe << 13; // xorshift
probe ^= probe >>> 17;
probe ^= probe << 5;
THREAD_PROBE.set(Thread.currentThread(), probe);
return probe;
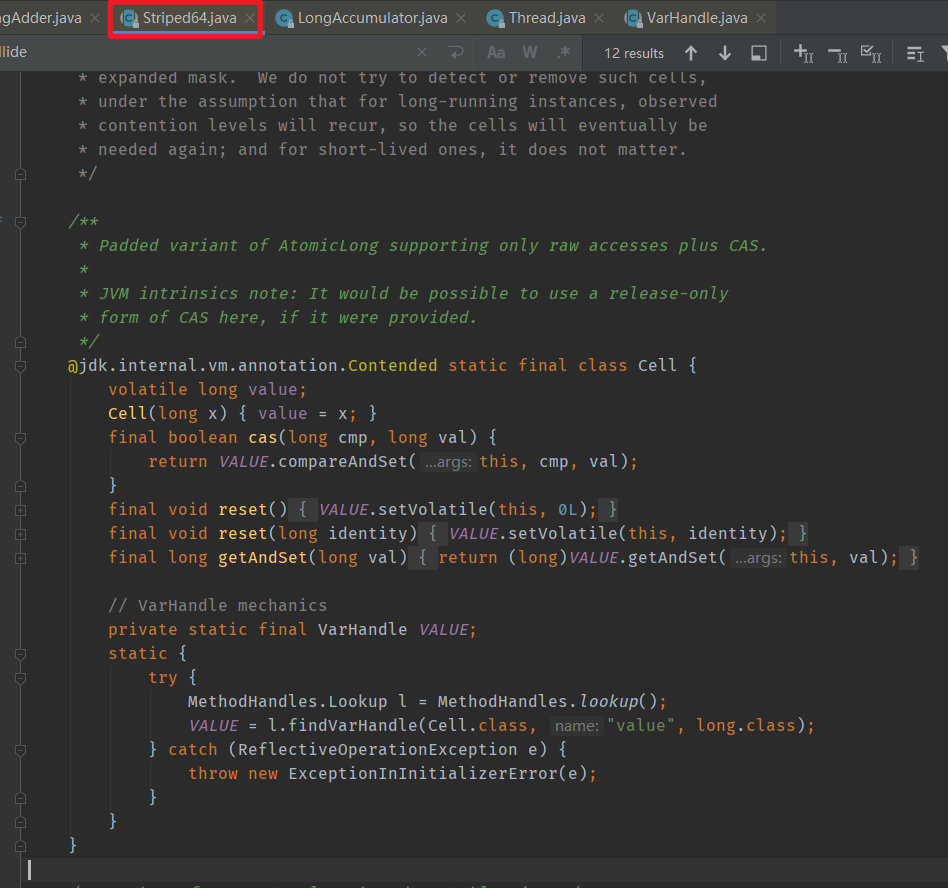
}4. Cell
是 java.util.concurrent.atomic 下 Striped64 的一个内部类, 它是LongAdder分散热点实现的具体载体
五、LongAdder源码解读深度分析
1. 源码解读概述
LongAdder在无竞争的情况,跟 AtomicLong 一样,对同一个base 进行操作,当出现竞争关系时则是采用化整为零的做法,从空间换时间,用一个数组cells,将一个value拆分进这个数组cells。多个线程需要同时对value进行操作时候,可以对线程id进行hash得到hash值,再根据hash值映射到这个数组cells的某个下标,再对该下标所对应的值进行自增操作。当所有线程操作完毕,将数组cells的所有值和无竞争值base都加起来作为最终结果。
数学表达
$$
value = base + \sum_{i=0}^n Cell[i]
$$
2. longAdder.increment() 方法解析
2.1 调用流程
java.util.concurrent.atomic.LongAdder#increment —> java.util.concurrent.atomic.LongAdder#add —> java.util.concurrent.atomic.Striped64#longAccumulate
2.2 add() 方法
/**
* Adds the given value.
*
* @param x the value to add
*/
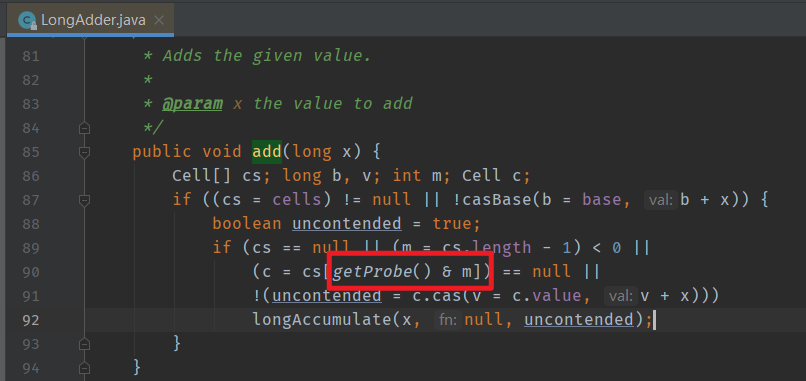
public void add(long x) {
Cell[] cs; // cells 的引用
long b; // 获取的base值
long v; // 期望值
int m; // cell数组的长度
Cell c; // 当前线程命中的cell单元格
// 首次首线程 (cs = cells) != null 一定是false,此时走casBase方法,以CAS的方式更新base值,且只有当cas失败时,才会走到if中
// 条件1: cells不为室,说明出现过竞争,cell[]己创建
// 条件2:cas操作base失败,说明其它线程先一步修改了base正在出现竞争
if ((cs = cells) != null || !casBase(b = base, b + x)) {
boolean uncontended = true; // true表示当前线程cas更新成功, false表示cas更新失败,线程处于竞争中
// 条件1: 表示cells为空,且线程处于竞争状态中,因为经过casBase方法返回false
// 条件2: cells数组长度小于0,这个应该不会出现
// 条件3: 当前线程所在的cell为空,说明当前线程还没有更新过cell,应初始化一个cell
// 条件4: 更新当前线程所在的cell失败,说明现在竞争很激烈,多个线程hash到了同一个cell,应扩容
// getProbe()方法返回的是线程中的threadLocalRandomProbe字段,它是通过随机数生成的一个值,对于一个确定的线程这个值是固定的(除非刻意修改它)
if (cs == null || (m = cs.length - 1) < 0 ||
(c = cs[getProbe() & m]) == null ||
!(uncontended = c.cas(v = c.value, v + x)))
// 调用striped64中的方法处理
longAccumulate(x, null, uncontended);
}
}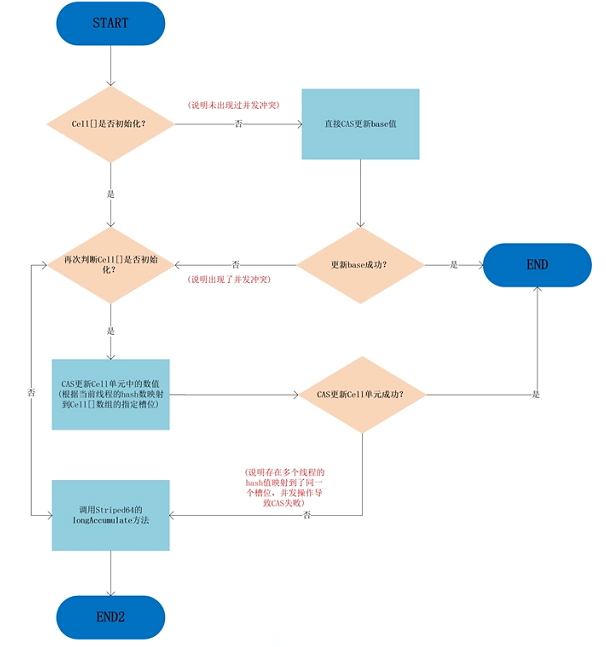
- 最初无竞争时只更新base;
- 如果更新base失败后,首次新建一个Cell[]数组
- 当多个线程竞争同一个Cell比较激烈时,可能就要对Cell[]扩容
2.3 longAccumulate() 方法
2.3.1 longAccumulate入参说明
- long x : 需要增加的值,一般默认都是1
- LongBinaryOperatorfn : 默认传递的是null
- wasUncontended : 竞争标识,如果是false则代表有竞争。只有cels初始化之后,并且当前线程CAS竞争修改失败,才会是false
2.3.2 Striped64中一些变量或者方法的定义
- base : 类似于AtomicLong中全局的value值。在没有竞争情况下数据直接累加到base上,或者cells扩容时,也需要将数据写入到base上
- collide : 表示扩容意向,false一定不会扩容,true可能会扩容。cellsBusy:初始化cells或者扩容cells需要获取锁,0:表示无锁状态 1:表示其他线程已经持有了锁
- casCellsBusy() : 通过CAS操作修改cellsBusy的值,CAS成功代表获取锁,返回true
- NCPU : 当前计算机CPU数量,Cell数组扩容时会使用到
- getProbe() : 获取当前线程的hash值
- advanceProbe() : 重置当前线程的hash值
2.3.3 线程hash值:probe
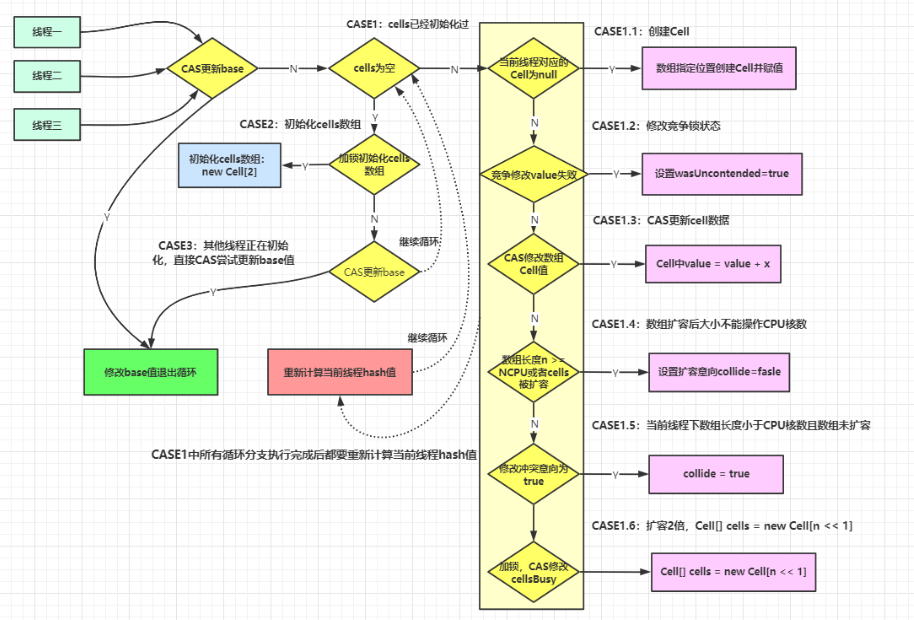
2.3.4 longAccumulate 源码总体概览
- CASE1:Cell[]数组已经初始化
- CASE2:Cell[]数组未初始化(首次新建)
- CASE3:Cell[]数组正在初始化中
2.3.5 详细解读
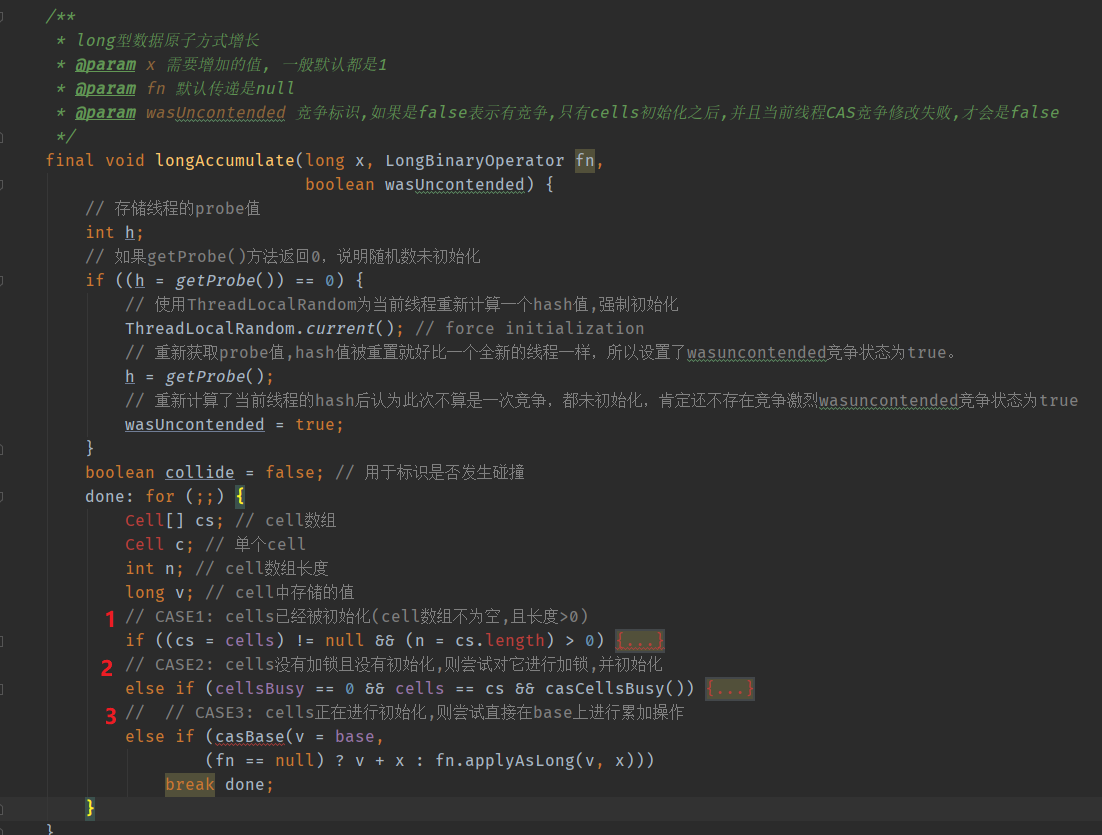
/**
 * long型数据原子方式增长
 * @param x 需要增加的值, 一般默认都是1
 * @param fn 默认传递是null
 * @param wasUncontended 竞争标识,如果是false表示有竞争,只有cells初始化之后,并且当前线程CAS竞争修改失败,才会是false
 */
final void longAccumulate(long x, LongBinaryOperator fn,
                          boolean wasUncontended) {
    // 存储线程的probe值
    int h;
    // 如果getProbe()方法返回0,说明随机数未初始化
    if ((h = getProbe()) == 0) {
        // 使用ThreadLocalRandom为当前线程重新计算一个hash值,强制初始化
        ThreadLocalRandom.current(); // force initialization
        // 重新获取probe值,hash值被重置就好比一个全新的线程一样,所以设置了wasuncontended竞争状态为true。
        h = getProbe();
        // 重新计算了当前线程的hash后认为此次不算是一次竞争,都未初始化,肯定还不存在竞争激烈wasuncontended竞争状态为true
        wasUncontended = true;
    }
    boolean collide = false; // 用于标识是否发生碰撞
    done: for (;;) {
        Cell[] cs; // cell数组
        Cell c; // 单个cell
        int n; // cell数组长度
        long v; // cell中存储的值
        // CASE1: cells已经被初始化(cell数组不为空,且长度>0)
        if ((cs = cells) != null && (n = cs.length) > 0) {
            if ((c = cs[(n - 1) & h]) == null) { // 当前线程的hash值运算后映射得到的Cell单元为null,说明该Cell没有被使用
                if (cellsBusy == 0) {       // Cell[]数组没有正在扩容, 尝试创建一个新的cell
                    Cell r = new Cell(x);   // 创建一个Cell单元,值为x
                    if (cellsBusy == 0 && casCellsBusy()) { // 尝试加锁,成功后cellsBusy == 1
                        try {               // Recheck under lock
                            Cell[] rs; // 新的cell数组
                            int m; // 新cell数组的长度
                            int j; // 新的cell在cell数组中的索引下标
                            // rs = cells 避免了对全局变量的直接引用, 提高安全性和效率,同时rs 和 cells指向同一个数组,rs变化,cells也会同步
                            if ((rs = cells) != null &&
                                    (m = rs.length) > 0 &&
                                    rs[j = (m - 1) & h] == null) {
                                rs[j] = r; // 将新创建的cell r 放入cell数组的计算位置
                                break done;
                            }
                        } finally {
                            cellsBusy = 0; // cell创建完成后,重新将cellsBusy置为0,非竞争状态
                        }
                        continue;           // Slot is now non-empty
                    }
                }
                collide = false;
            }
            else if (!wasUncontended)       // 如果前一次CAS更新Cell单元失败了
                wasUncontended = true;      // 重新置为true,后面会重新计算线程的hash值
            else if (c.cas(v = c.value,
                    (fn == null) ? v + x : fn.applyAsLong(v, x))) // 试CAS更新Cell单元值
                break;
            else if (n >= NCPU || cells != cs) // 当Cell数组的大小超过CPU核数后,不再进行扩容
                collide = false;            // At max size or stale
            else if (!collide)
                collide = true;
            else if (cellsBusy == 0 && casCellsBusy()) { // 尝试加锁进行扩容
                try {
                    if (cells == cs) // cells和局部变量cs相同,表示没有其他线程扩容过
                        cells = Arrays.copyOf(cs, n << 1); // 扩容后的大小==当前容量*2
                } finally {
                    cellsBusy = 0;
                }
                collide = false;
                continue;                   // Retry with expanded table
            }
            h = advanceProbe(h); // 计算线程新的hash值,重新参与下一轮竞争中
        }
        // CASE2: cells没有加锁且没有初始化,则尝试对它进行加锁,并初始化
        else if (cellsBusy == 0 && cells == cs && casCellsBusy()) {
            try {                           // Initialize table
                if (cells == cs) { // 进行两次校验, 由于cells是共有的对象,可能出现多线程并发修改导致对象状态发生变化,两次校验确保数据状态一致
                    Cell[] rs = new Cell[2]; // 新建一个容量为2的cell数组
                    rs[h & 1] = new Cell(x); // 找到当前线程hash到数组中的位置,并创建对应的cell
                    cells = rs;
                    break done;
                }
            } finally {
                cellsBusy = 0;
            }
        }
        //  // CASE3: cells正在进行初始化,则尝试直接在base上进行累加操作
        else if (casBase(v = base,
                (fn == null) ? v + x : fn.applyAsLong(v, x)))
            break done;
    }
}
3. sum() 方法
sum()会将所有Cell数组中的value和base累加作为返回值。
核心的思想就是将之前AtomicLong一个value的更新压力分散到多个value中去,从而降级更新热点。
为什么在并发情况下sum的值不精确
sum执行时,并没有限制对base和cells的更新(关键点)。所以LongAdder不是强一致性的,它是最终一致性的。
- sum执行时,并没有限制对base和cells的更新(一句要命的话)。所以LongAdder不是强一致性的,它是最终一致性的。
- sum执行时,并没有限制对base和cells的更新(一句要命的话)。所以LongAdder不是强一致性的,它是最终一致性的。

六、总结
1. AtomicLong与LongAdder对比
AtomicLong
- 线程安全,可允许一些性能损耗,要求高精度时可使用
- 保证精度,性能代价
- AtomicLong是多个线程针对单个热点值value进行原子操作
LongAdder
- 当需要在高并发下有较好的性能表现,且对值的精确度要求不高时,可以使用
- 保证性能,精度代价
- LongAdder是每个线程拥有自己的槽,各个线程一般只对自己槽中的那个值进行CAS操作
2. AtomicLong
原理
- CAS+自旋
- incrementAndGet
场景
- 低并发下的全局计算
- AtomicLong能保证并发情况下计数的准确性,其内部通过CAS来解决并发安全性的问题。
缺陷
高并发后性能急剧下降,AtomicLong的自旋会成为瓶颈
N个线程CAS操作修改线程的值,每次只有一个成功过,其它N - 1失败,失败的不停的自旋直到成功,这样大量失败自旋的情况,一下子cpu就打高了。
3. LongAdder
原理
- CAS+Base+Cell数组分散
- 空间换时间并分散了热点数据
场景
高并发下的全局计算
缺陷
sum求和后还有计算线程修改结果的话,最后结果不够准确
转载请注明来源,欢迎对文章中的引用来源进行考证,欢迎指出任何有错误或不够清晰的表达。可以在下面评论区评论,也可以邮件至 george_95@126.com